seata主推的是AT模式强一致性解决方案,所以我们采用这个方案来解决前面案例的分布式问题。
下载和运行seata server
seata server地址:https://github.com/seata/seata/releases
最新版本 v1.4.2
用macOS或者Linux的下载:seata-server-1.4.2.tar.gz
用windows的下载seata-server-1.4.2.zip
编辑seata-server配置文件
seata server所有的配置都在conf文件夹内,该文件夹内有两个文件我们必须要详细介绍下。
seata server默认使用file(文件方式)进行存储事务日志、事务运行信息,我们可以通过-m db脚本参
数的形式来指定,目前仅支持file、db这两种方式。
file.conf
该文件用于配置存储方式、透传事务信息的NIO等信息,默认对应registry.conf文件内的file方式配置。
registry.conf
seata server核心配置文件,可以通过该文件配置服务注册方式、配置读取方式。
注册方式目前支持file 、nacos 、eureka、redis、zk、consul、etcd3、sofa等方式,默认为file,对应读取file.conf内的注册方式信息。
读取配置信息的方式支持file、nacos 、apollo、zk、consul、etcd3等方式,默认为file,对应读取file.conf文件内的配置。
file.conf 加一个service 配置:
1
2
3
4
5
6
7
8
9
10
11
12
13
| service {
vgroupMapping.my_test_tx_group = "default"
default.grouplist = "127.0.0.1:8091"
enableDegrade = false
disable = false
max.commit.retry.timeout = "-1"
max.rollback.retry.timeout = "-1"
}
|
这里事务分组概念,另外单独讲,主要是为了集群故障的时候,能快速切换,实现高可用;
配置分组映射,集群分组再配置grouplist,暴露server地址,提供给seata-client调用;
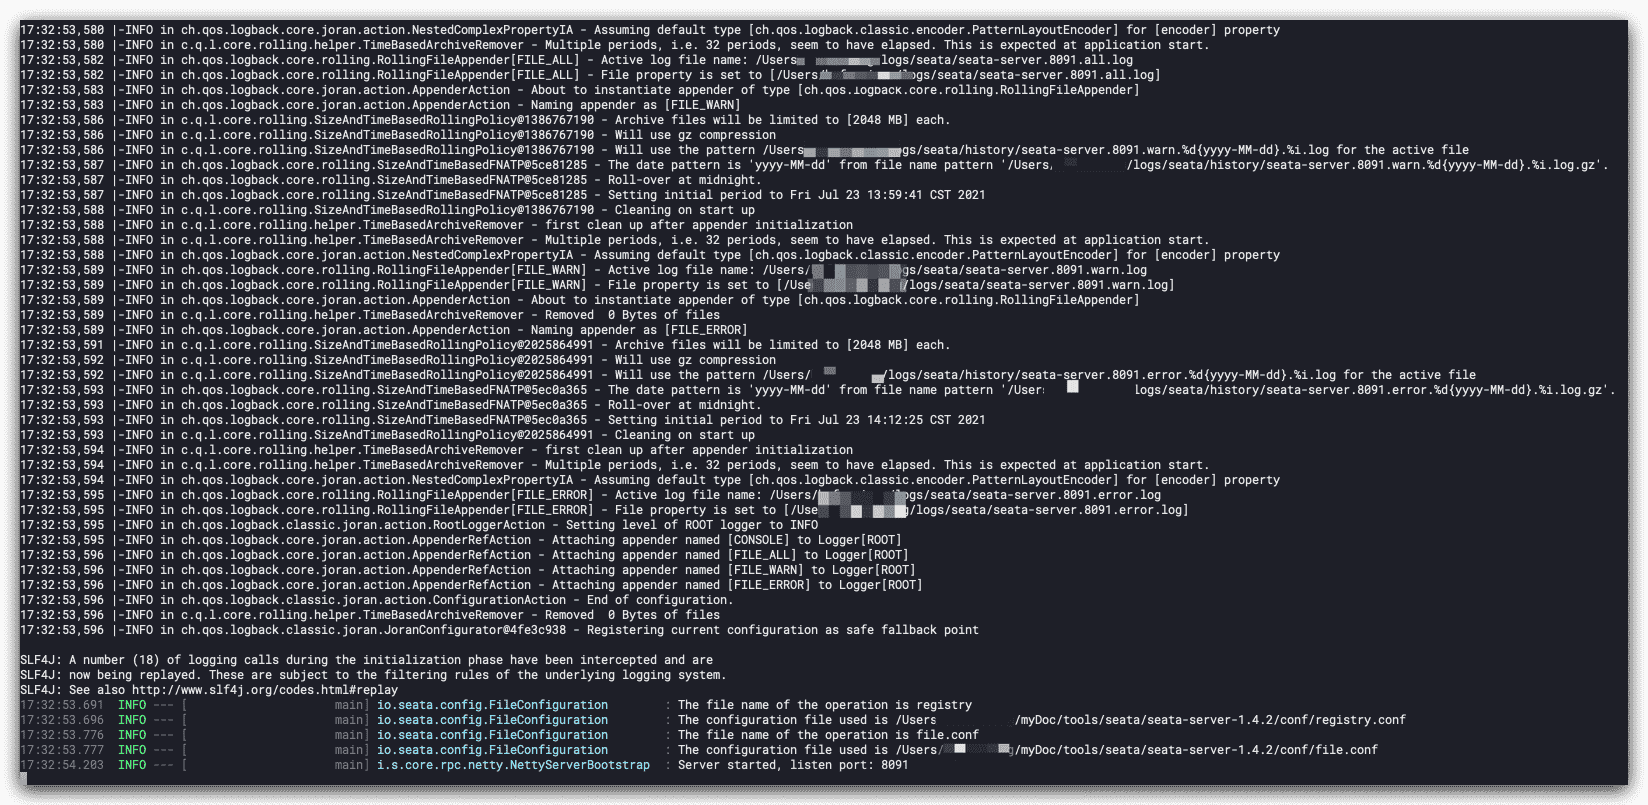
最后运行bin目录下的seata-server.sh启动seata-server,启动OK,监听端口8091
每个数据库都建一个undo_log回滚日志表
根据seata AT模式规范,我们新建undo_log表,db_account和db_order都要建;
1
2
3
4
5
6
7
8
9
10
11
12
13
| CREATE TABLE `undo_log` (
`id` bigint(20) NOT NULL AUTO_INCREMENT,
`branch_id` bigint(20) NOT NULL,
`xid` varchar(100) NOT NULL,
`context` varchar(128) NOT NULL,
`rollback_info` longblob NOT NULL,
`log_status` int(11) NOT NULL,
`log_created` datetime NOT NULL,
`log_modified` datetime NOT NULL,
`ext` varchar(100) DEFAULT NULL,
PRIMARY KEY (`id`),
UNIQUE KEY `ux_undo_log` (`xid`,`branch_id`)
) ENGINE=InnoDB AUTO_INCREMENT=3 DEFAULT CHARSET=utf8
|
项目里添加seata-client maven依赖
我们只需要在seata-common公共模块项目里添加seata依赖,其他子模块都有了,方便;
1
2
3
4
| <dependency>
<groupId>com.alibaba.cloud</groupId>
<artifactId>spring-cloud-starter-alibaba-seata</artifactId>
</dependency>
|
项目里配置seata分布式事务
首先是每个项目都要配置seata支持,请求seata-server,根据配置;
再通过@GlobalTransactional注解,开启全局分布式事务;
修改配置文件
seata-order子项目 application.yml配置改下,主要多了服务分组和集群分组的配置:
seata-order/application.yml1
2
3
4
5
6
7
8
9
10
11
12
13
14
15
16
17
18
19
20
21
22
23
24
25
26
27
28
29
30
31
32
33
| server:
port: 8081
servlet:
context-path: /
mybatis:
mapper-locations: classpath:mybatis/mapper/*.xml
spring:
application:
name: seata-order
datasource:
type: com.alibaba.druid.pool.DruidDataSource
driver-class-name: com.mysql.jdbc.Driver
url: jdbc:mysql://localhost:3306/db_order?serverTimezone=Asia/Shanghai
username: root
password: root
cloud:
nacos:
discovery:
server-addr: 127.0.0.1:8848
alibaba:
seata:
tx-service-group: my_test_tx_group
seata:
service:
vgroup-mapping:
my_test_tx_group: default
grouplist:
default: 127.0.0.1:8091
enable-degrade: false
disable-global-transaction: false
|
同理,seata-account下的application.yml配置:
seata-account/application.yml1
2
3
4
5
6
7
8
9
10
11
12
13
14
15
16
17
18
19
20
21
22
23
24
25
26
27
28
29
30
31
32
| server:
port: 8082
servlet:
context-path: /
mybatis:
mapper-locations: classpath:mybatis/mapper/*.xml
spring:
application:
name: seata-account
datasource:
type: com.alibaba.druid.pool.DruidDataSource
driver-class-name: com.mysql.jdbc.Driver
url: jdbc:mysql://localhost:3306/db_order?serverTimezone=Asia/Shanghai
username: root
password: root
cloud:
nacos:
discovery:
server-addr: 127.0.0.1:8848
alibaba:
seata:
tx-service-group: my_test_tx_group
seata:
service:
vgroup-mapping:
my_test_tx_group: default
grouplist:
default: 127.0.0.1:8091
enable-degrade: false
disable-global-transaction: false
|
seata-web下的application.yml配置:
seata-web/application.yml1
2
3
4
5
6
7
8
9
10
11
12
13
14
15
16
17
18
19
20
21
22
23
| server:
port: 80
servlet:
context-path: /
spring:
application:
name: seata-web
cloud:
nacos:
discovery:
server-addr: 127.0.0.1:8848
alibaba:
seata:
tx-service-group: my_test_tx_group
seata:
service:
vgroup-mapping:
my_test_tx_group: default
grouplist:
default: 127.0.0.1:8091
enable-degrade: false
disable-global-transaction: false
|
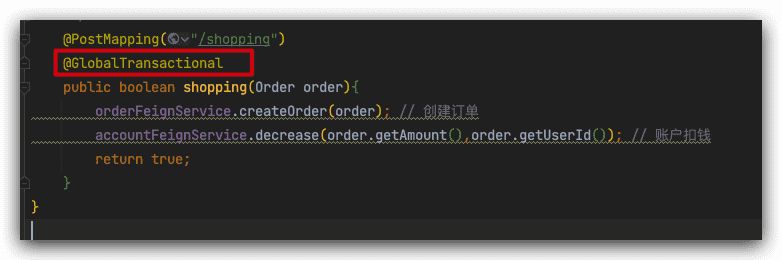
添加@GlobalTransactional注解
seata-web项目->WebController->shopping方法,添加@GlobalTransactional注解
分布式案例测试
三个子项目一起运行;
seata-server日志显示:两个RM在seata-server注册成功;

seata-web项目的RM,TM注册成功:

seata-order项目的TM注册成功:

seata-account项目的TM注册成功:

setata二阶段提交过程剖析
因为是执行是一瞬间的,很多人根本无法感受到内部的二阶段提交过程。
所以我们在再seata-account项目里搞个断点,来看下回滚的一个流程;
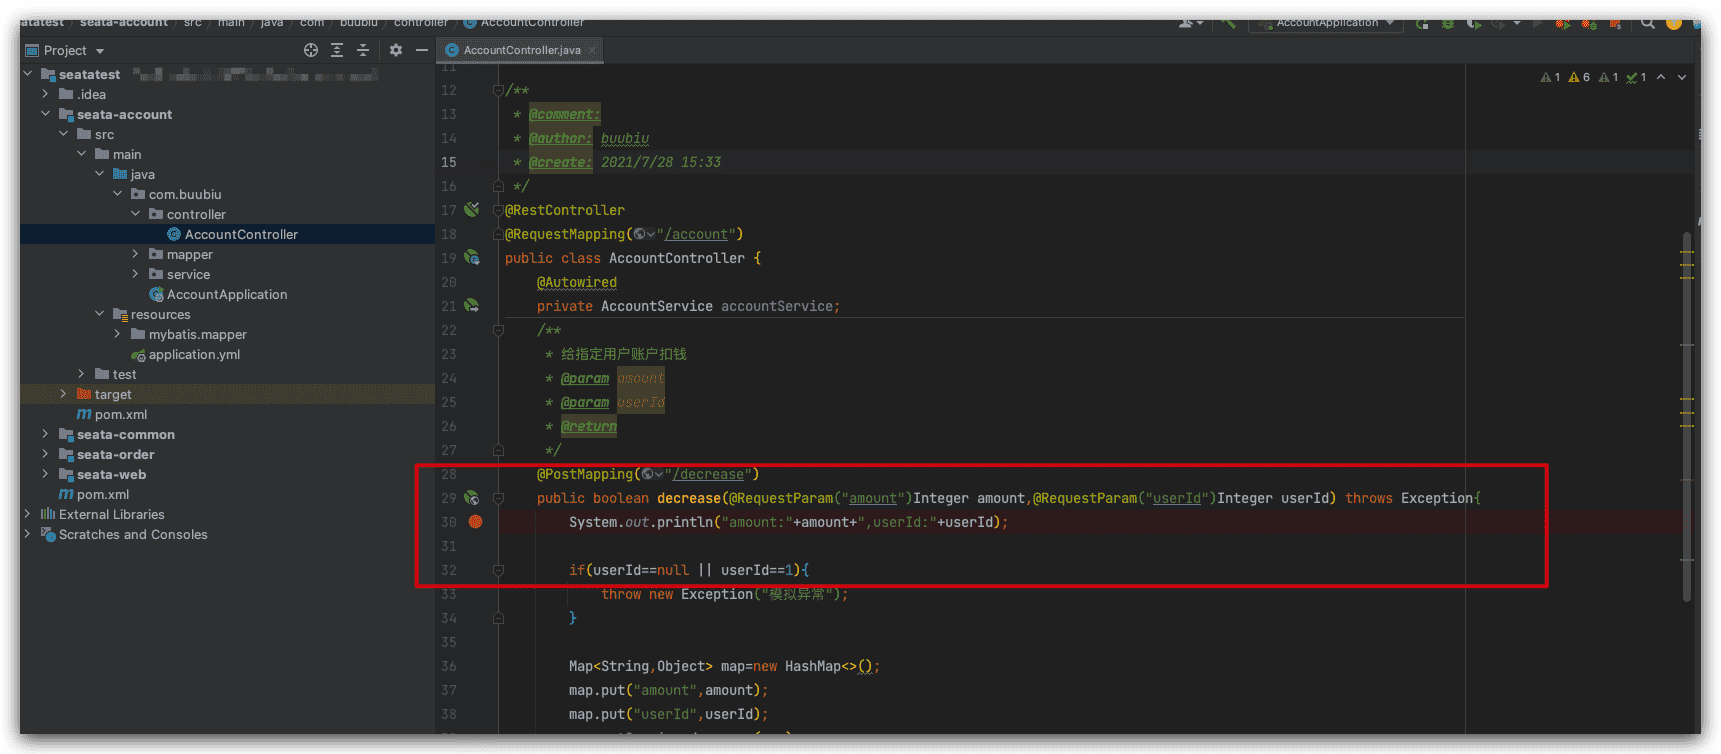
seata-account项目debug启动;
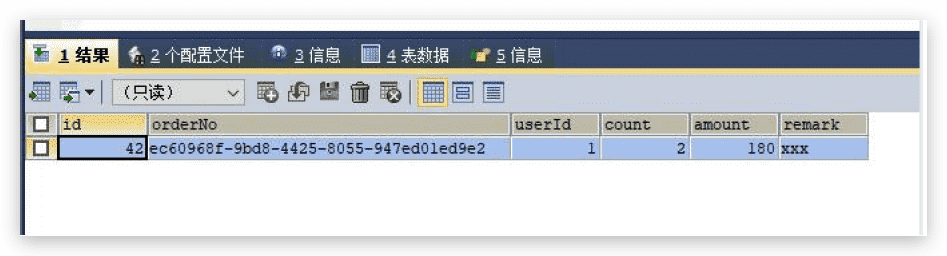
再次postman测试,我们立刻查看db_order数据库表信息(比较难捕获,因为提交事务超时就立刻回滚,看不到信息)
订单服务执行完的时候,db_order有数据
undo_log也有数据

说明一阶段业务数据和回滚日志记录在同一个本地事务中提交,释放本地锁和连接资源。
然后: